How to Add a Digital Product Passport to Your Product Packaging: A Step-by-Step Design Guide
Digital Product Passports represent a powerful regulatory compliance tool and consumer engagement opportunity—but all that potential means nothing if customers can't actually access your passport. The physical implementation of DPPs through QR codes, NFC tags, or printed URLs on your product packaging is where digital compliance meets tangible design.
This comprehensive guide focuses on the practical, design-focused aspects of DPP implementation: where to place QR codes on different packaging types, what sizes ensure reliable scanning, what print specifications prevent scanning failures, how to integrate access points aesthetically into your brand design, and common mistakes that undermine both compliance and user experience.
Whether you're selling fashion, electronics, cosmetics, or home goods through your Shopify store, this step-by-step guide will help you successfully bridge the gap between your digital passport data and your customers' smartphones.
Understanding QR Code Basics for DPP Implementation
Before diving into placement and design specifics, let's establish what makes QR codes work reliably for Digital Product Passport access.
What is a QR Code?
QR (Quick Response) codes are two-dimensional barcodes that encode information—typically a URL—in a machine-readable format. When scanned with a smartphone camera, they direct users to web content. For DPPs, that content is your comprehensive product passport information.
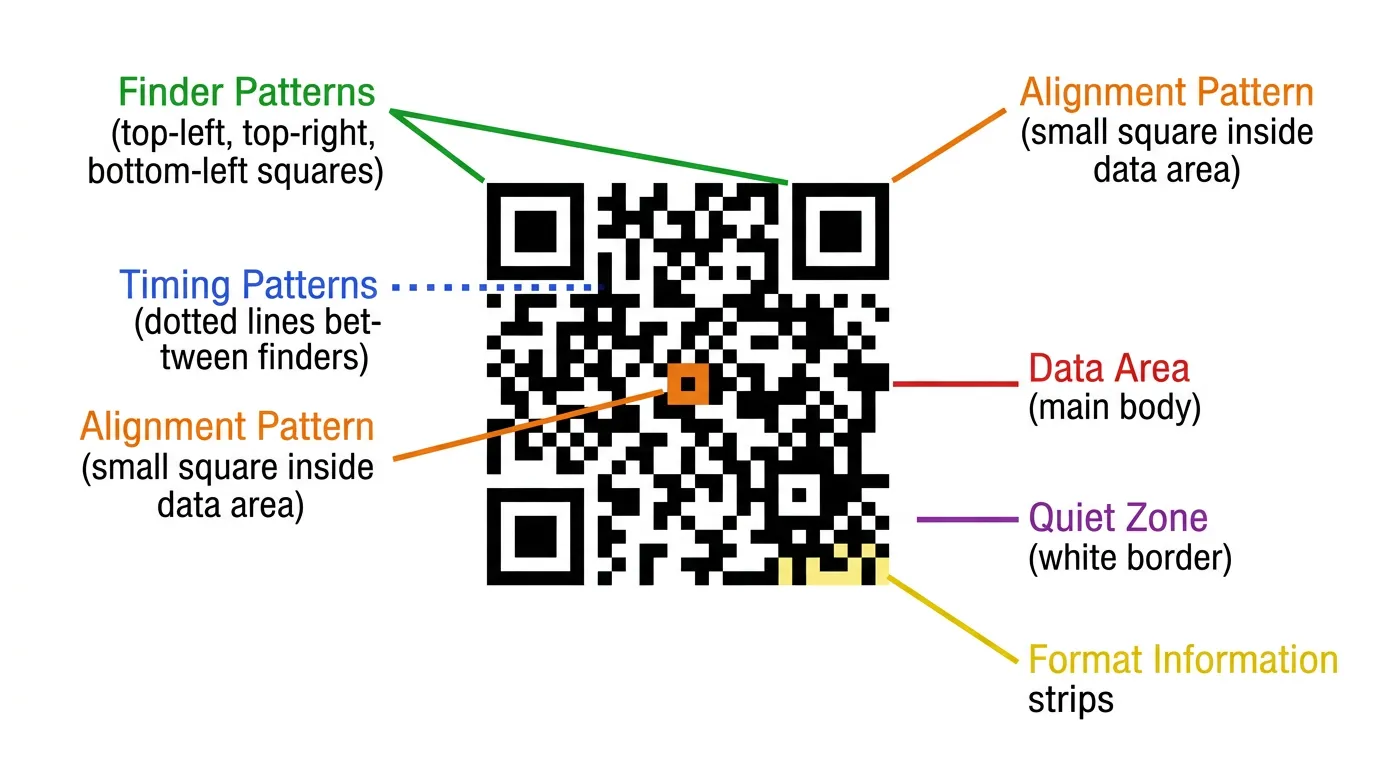
QR codes consist of several key elements:
- Positioning markers (the three large squares in corners) that help scanners orient the code
- Alignment patterns for larger codes to maintain accuracy
- Timing patterns that establish the code's grid structure
- Data area containing the encoded information
- Quiet zone (white space around the code) essential for scanning reliability
- Error correction patterns that allow codes to function even when partially damaged
QR Code Versions and Capacity
QR codes come in different versions (sizes) from Version 1 (21x21 modules) to Version 40 (177x177 modules). For DPP URLs, you'll typically use Version 3-7, which comfortably encodes URLs while remaining compact enough for product packaging.
Data capacity varies by version:
- Version 3: ~35 alphanumeric characters
- Version 5: ~54 alphanumeric characters
- Version 7: ~78 alphanumeric characters
- Version 10: ~119 alphanumeric characters
For DPP implementation, use shortened URLs (e.g., passportpro.eu/p/ABC123 rather than www.yourstore.com/pages/digital-product-passport?id=ABC123456789) to minimize QR code complexity and size.
Error Correction Levels
QR codes include redundancy through error correction, allowing them to remain scannable even when damaged:
- Level L: 7% error correction (suitable for clean indoor environments)
- Level M: 15% error correction (standard recommendation)
- Level Q: 25% error correction (better for outdoor or wear-prone applications)
- Level H: 30% error correction (maximum durability, but requires larger codes)
For product packaging, Level M or Q balances reliability with space efficiency. For products exposed to harsh conditions (outdoor gear, industrial products), consider Level Q or H.
Minimum QR Code Size Requirements
The most common reason QR codes fail to scan is simply being too small. While technically a QR code can encode information at tiny sizes, real-world scanning requires sufficient size for smartphone cameras to capture and process the code reliably.
Recommended Minimum Sizes
General minimum for reliable scanning:
- 2cm x 2cm (approximately 0.79 inches square) for optimal conditions
- 2.5cm x 2.5cm (approximately 1 inch square) for typical retail packaging
- 3cm x 3cm or larger for premium, easy-scanning experience
These minimums assume:
- Standard smartphone cameras (not premium or older models)
- Normal lighting conditions (not dim or harsh glare)
- Typical scanning distance (15-25cm from package)
- Error correction Level M
Adjust size based on context:
| Context | Recommended Minimum Size | Rationale |
|---|---|---|
| Small product labels (cosmetics, supplements) | 2cm x 2cm | Space-constrained, assume close scanning |
| Standard retail boxes | 2.5cm x 2.5cm | Balance visibility and space efficiency |
| Hang tags and large packaging | 3-4cm x 3-4cm | Take advantage of available space |
| Outdoor/industrial products | 3.5cm x 3.5cm | Account for challenging scanning conditions |
| Promotional materials | 4cm+ x 4cm+ | Maximize scanability and visual impact |
The Scanning Distance Formula
A useful rule of thumb: QR code size should be at least 10% of the scanning distance.
If you expect customers to scan from 30cm away, your QR code should be at least 3cm x 3cm. For hang tags scanned from 20cm, 2cm x 2cm suffices. For large packaging or displays scanned from 50cm, use at least 5cm x 5cm.
This formula accounts for camera resolution limitations and ensures codes remain reliably scannable across typical use cases.
Print Specification Requirements
Even perfectly sized QR codes fail if print quality is inadequate. The following technical specifications ensure your QR codes scan reliably when printed on various packaging materials.
Contrast Ratio Requirements
QR codes rely on high contrast between dark modules (usually black) and light background (usually white) for scanner recognition.
Minimum contrast ratio: 70% contrast between foreground and background Recommended contrast ratio: 80%+ for reliable scanning Optimal contrast: Black on white (100% contrast)
Calculate contrast ratio:
Contrast Ratio = (L1 - L2) / L1 × 100%
Where L1 is the lighter color's luminance and L2 is the darker color's luminance.
Acceptable color combinations:
- Black on white (optimal)
- Dark navy on white (good)
- Dark brown on cream (acceptable)
- Dark green on white (acceptable)
Avoid:
- Light colors on white (insufficient contrast)
- Dark on dark (no contrast)
- Colored backgrounds behind codes (creates visual noise)
- Gradients or patterns in quiet zone
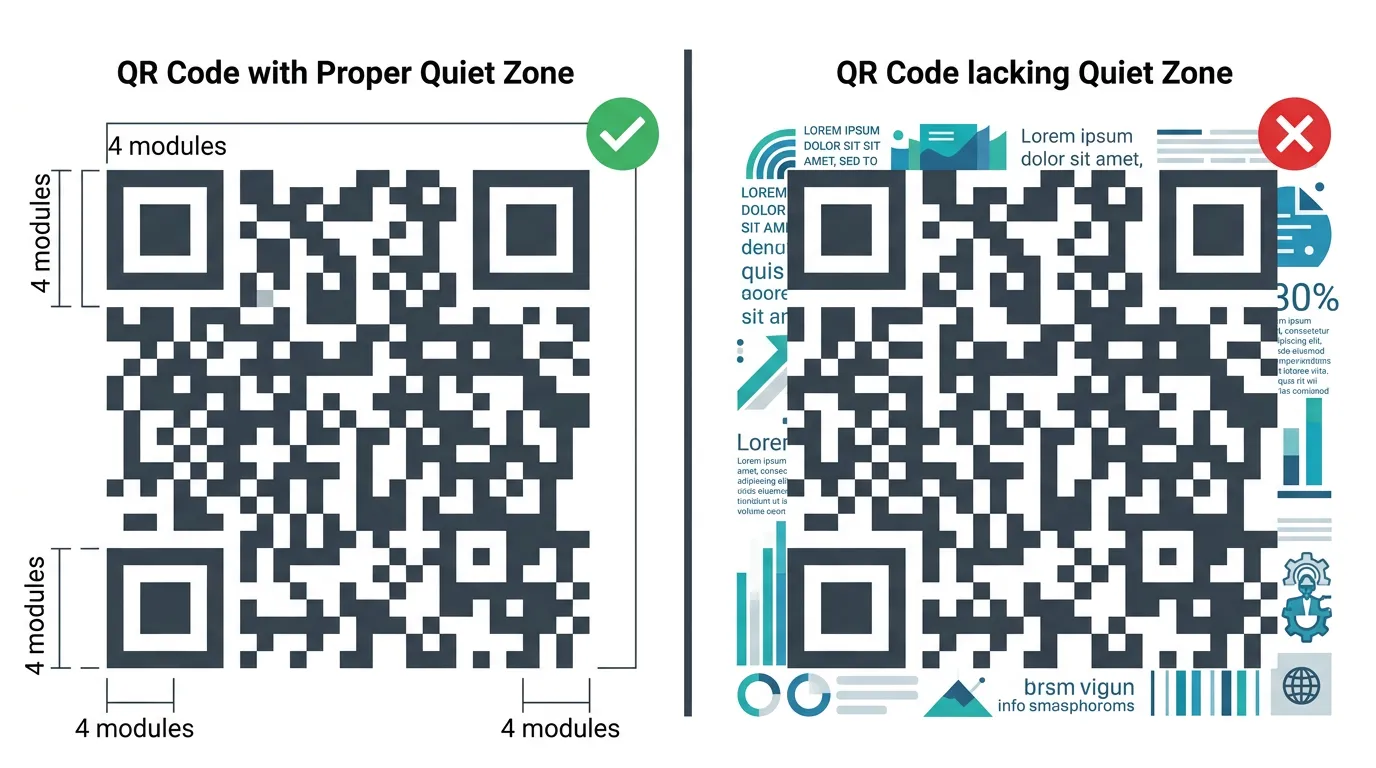
The Quiet Zone (White Space Border)
The quiet zone is the clear, empty space surrounding your QR code. Scanners use this area to distinguish the code from surrounding content.
Minimum quiet zone width: 4 modules (the width of 4 small squares in the QR code pattern)
For a QR code printed at 2.5cm x 2.5cm:
- If the code itself has 25 modules across, each module is 1mm
- Quiet zone should be at least 4mm on all sides
- Total space required: 3.3cm x 3.3cm (including quiet zone)
Many packaging designs fail because the quiet zone is violated by:
- Text too close to the code
- Decorative elements encroaching on the border
- Color bleeds from adjacent design elements
- Trimming or folding that cuts into the quiet zone
Always account for quiet zone in your design layout. It's not optional white space—it's essential for functionality.
Resolution and DPI Requirements
Print resolution affects the sharpness of QR code edges, which impacts scanning reliability.
Minimum print resolution:
- 300 DPI for most packaging applications
- 600 DPI for small codes (under 2cm) or fine details
- 1200 DPI for extremely small applications (labels under 1.5cm)
Module size in printing: Each individual square (module) within the QR code should be at least 0.5mm at its smallest dimension when printed. Below this threshold, printer limitations may cause modules to blend together, preventing successful scans.
For digital printing or lower-quality methods:
- Use slightly larger codes to compensate for potential ink spread
- Test printed samples before full production runs
- Consider upgrading to higher quality printing methods for critical applications
Print Method Considerations
Different printing technologies affect QR code quality:
Offset printing:
- Excellent for large runs (1000+ units)
- High precision and consistency
- Best for complex packaging with integrated design
- Ensure printer uses appropriate screen ruling (150 LPI or higher)
Digital printing:
- Ideal for short to medium runs (100-1000 units)
- Good quality with modern equipment
- Variable data capability (unique QR codes per unit)
- Test samples carefully as quality varies by equipment
Screen printing:
- Works well for simple packaging (bags, pouches)
- Ensure adequate ink coverage for opacity
- May require larger codes due to lower precision
Thermal transfer (labels):
- Excellent contrast and durability
- Good for inventory labels and warehouse applications
- Well-suited to variable data and unique QR codes
Inkjet (promotional materials):
- Variable quality depending on printer
- Higher risk of poor contrast or bleeding
- Use larger codes and high-quality settings
- Test extensively before production
Material Surface Considerations
The packaging material itself affects QR code scanning:
Smooth, matte surfaces (ideal):
- Paper, cardboard, matte labels
- Excellent scanning reliability
- No glare or reflection issues
Glossy or reflective surfaces (challenging):
- Coated paper, laminated labels, plastic packaging
- Can create glare that interferes with scanning
- Mitigate by using spot UV or matte finishing over QR code area
- Consider slightly larger codes to improve success rate
Textured or uneven surfaces (difficult):
- Corrugated cardboard, fabric, embossed materials
- Codes may distort or create shadows
- Use larger codes and higher error correction levels
- Consider affixing separate smooth labels for QR codes
Transparent or metallic materials (special handling):
- Clear plastic, metallic films, reflective packaging
- May require opaque background squares behind QR codes
- Test multiple lighting conditions
- Consider alternative placement on non-reflective areas
QR Code Placement by Packaging Type
Where you place QR codes significantly impacts customer discovery and scanning success. Optimal placement varies by packaging format.
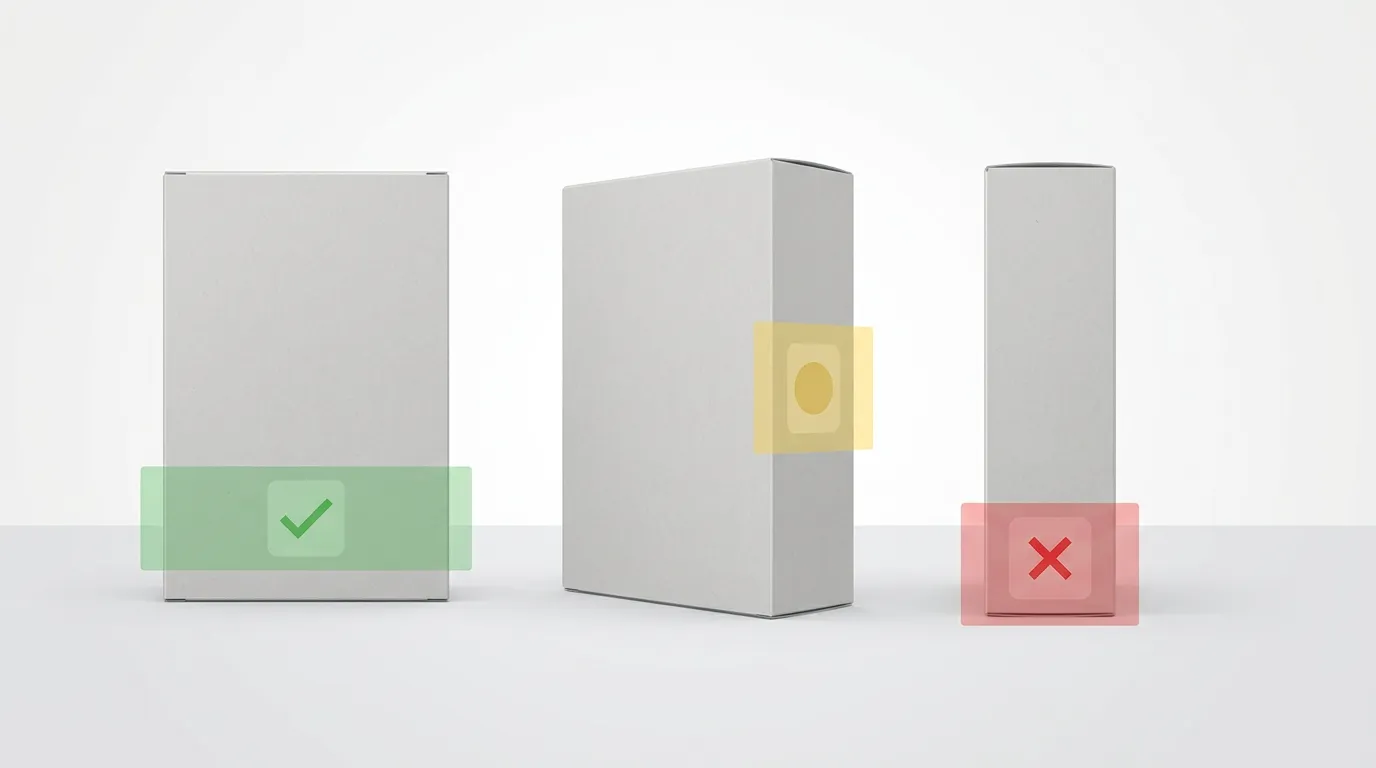
Retail Boxes and Cartons
Primary placement: Back panel, lower third
- Most accessible for in-hand scanning
- Doesn't interfere with front-facing brand presentation
- Natural location for regulatory and additional information
- Easy to scan before opening product
Alternative placement: Side panel
- Useful when back panel is crowded
- Good for products displayed face-out on shelves
- Ensure it's not the panel used for shelf stacking
Avoid: Bottom panel
- Difficult to access when product is on shelf
- Awkward to scan without removing from display
- Only acceptable for large items customers will definitely handle
Integration tips:
- Group QR code with other informational elements (barcodes, recycling symbols)
- Include brief explanatory text: "Scan for product passport" or "Product information"
- Use branded design elements (subtle border, your color palette) to integrate aesthetically
Poly Bags and Flexible Packaging
Primary placement: Back center or bottom back
- Visible when package is flipped over
- Accessible before opening
- Stays flat for easy scanning (avoid placement over folds)
Alternative placement: Separate label/sticker
- Affixed to front or back
- Allows higher print quality on smooth label stock
- Can be designed separately from main packaging printing
Challenges with poly bags:
- Flexing and wrinkling can distort codes
- Movement can make focusing difficult
- Reflectivity of clear bags creates glare
Solutions:
- Use larger codes (3cm minimum) to account for distortion
- Print on matte labels or matte areas of bag
- Consider heat-sealing or stitching codes flat
- Test scanning with bag empty and filled
Hang Tags
Primary placement: Back of tag
- Keeps front available for branding and pricing
- Natural flip location for additional information
- Ample space for properly sized codes
Alternative placement: Front bottom corner
- Increases visibility and discovery
- Works when back is used for multi-language text
- Can become design feature with proper integration
Advantages of hang tags:
- Plenty of space for larger codes (3-4cm)
- Typically high-quality card stock with excellent contrast
- Removable, allowing scanning even after product opening
- Can include instructional text without space constraints
Design integration:
- Align QR code with other tag elements (hole punch, brand logo)
- Use tag shape creatively (QR code on back matches front design)
- Include clear call-to-action: "Scan to discover product story"
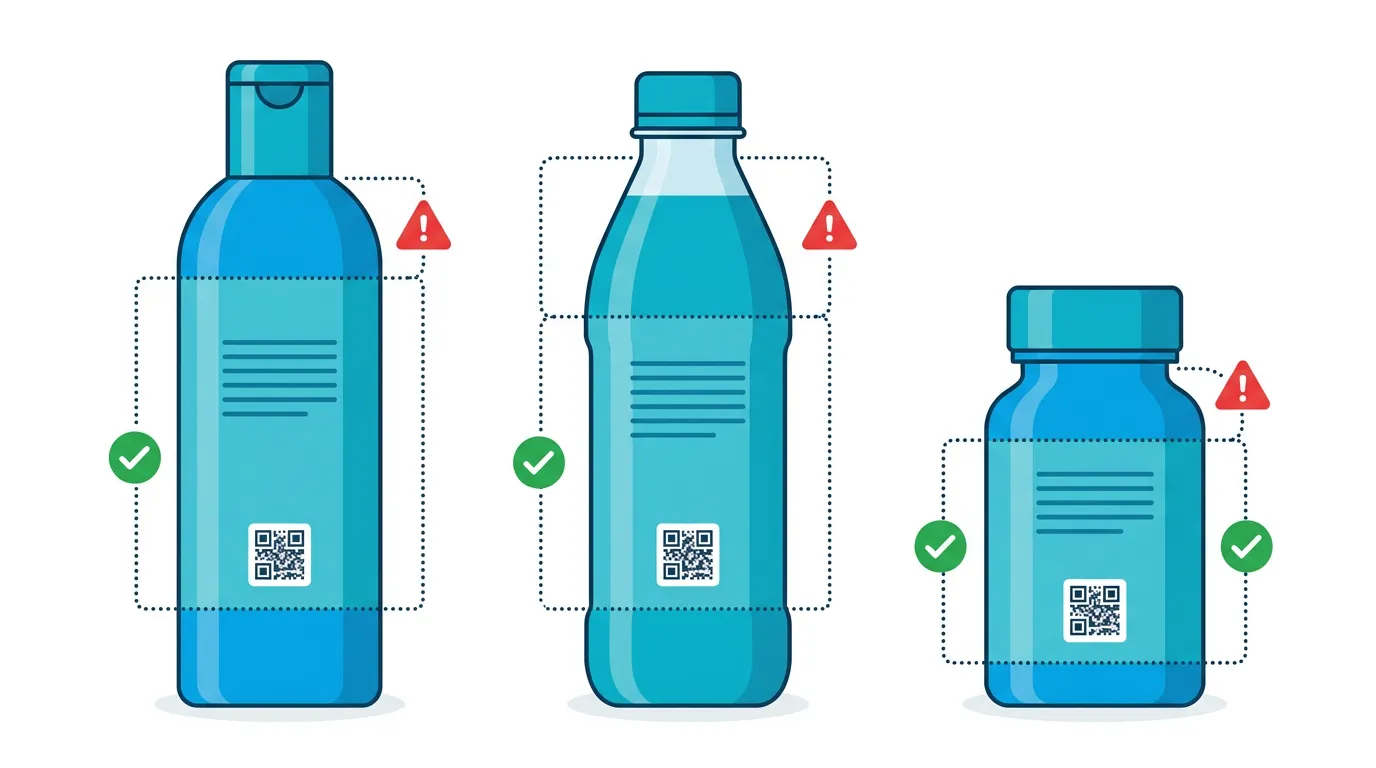
Product Labels (Bottles, Jars, Tubes)
Primary placement: Back label
- Standard information placement consumers expect
- Doesn't interfere with front brand identity
- Typically flat surface ideal for scanning
Alternative placement: Neck label or collar
- Good for bottles where back label is crowded
- Creates premium, specialty feeling
- Requires very clear instructions for discovery
Size considerations for small products:
- Scale code to available space, respecting 2cm minimum
- On very small products (travel sizes, samples), consider simplified data or URL-only approach
- Use higher error correction since codes may be smaller
Curved surface challenges:
- Cylindrical bottles can distort QR codes at edges
- Place codes on flattest part of label panel
- Test by printing on actual bottle mockups
- Consider slightly larger codes to account for curvature
Tissue Paper and Interior Packaging
Use case: Premium unboxing experience
- Tissue paper wrapping products
- Interior box lids
- Protective sleeves
- Foam inserts
Placement considerations:
- Must be discovered during natural unboxing process
- Should feel intentional, not haphazard
- Works best when paired with engagement messaging
Design approach:
- Make QR code part of branded unboxing experience
- Include context: "You're part of something transparent"
- Use high-quality printing to match premium positioning
- Ensure durability (codes shouldn't rub off during shipping)
Limitations:
- May be discarded before scanning
- Not suitable for regulatory compliance alone (must also appear on permanent packaging)
- Best as supplementary access point, not primary
Direct Product Marking
Applicable to:
- Electronics (housing or battery compartment labels)
- Appliances (data plates)
- Durable goods (furniture, tools)
- Premium products justifying permanent marking
Marking methods:
- Laser etching (high durability, high contrast)
- Molded into plastic (during manufacturing)
- Permanent adhesive labels (industrial-grade)
- Silk screening (for metal or hard surfaces)
Advantages:
- Survives packaging disposal
- Available throughout product lifecycle
- Supports post-sale servicing and recycling
Requirements:
- Extremely high durability standards
- Must remain scannable for years
- Consider product environment (moisture, UV exposure, abrasion)
NFC Tags: An Alternative for Premium Products
While QR codes are the most common DPP access method, Near Field Communication (NFC) tags offer an alternative particularly suited to premium products and enhanced user experiences.
What is NFC?
NFC enables wireless communication over very short distances (typically under 10cm). NFC-enabled smartphones can read NFC tags by simply tapping the device against the tag location—no camera, no scanning, just tap.
NFC advantages:
- Seamless experience: Tap is faster and more intuitive than QR scanning
- Premium perception: Creates modern, high-tech brand association
- Durability: Tags can be embedded in products, not just surface-applied
- Multi-functionality: Can trigger multiple actions (product registration, warranty activation, passport access)
- Works in low light: Unlike QR codes, doesn't require camera to focus visually
NFC limitations:
- Higher cost: NFC tags cost significantly more than printing QR codes (€0.10-€1.00+ per tag vs. negligible printing cost)
- Device compatibility: Not all smartphones support NFC (though most modern phones do)
- Shorter read range: Requires deliberate close contact
- No visual component: Less discoverable than QR codes without instructions
When to Use NFC for DPPs
NFC makes sense for:
Premium product categories:
- Luxury fashion and accessories
- High-end electronics
- Designer home goods
- Jewelry and watches
Products with high unit value (where tag cost is proportionally small):
- Items over €50-100 retail price
- Products where premium experience justifies cost
Products where QR codes aren't aesthetically suitable:
- Minimalist design products
- Items where surface printing is undesirable
- Products where branding requires completely clean exterior
Multi-functional use cases:
- Combining DPP access with product authentication (anti-counterfeiting)
- Enabling product registration, warranty tracking, and passport access
- Creating interactive experiences (tap to see styling tips, recipes, tutorials)
NFC Implementation Specifications
Tag types:
- NTAG series (NTAG213, NTAG215, NTAG216) - industry standard for URL redirection
- MIFARE - additional security features for premium applications
- Custom chips - for brands needing specialized functionality
Tag sizes:
- Inlay stickers: 25mm-50mm diameter (most common)
- Mini tags: 10mm-15mm (for small products or discrete embedding)
- Keyfobs and cards: Larger formats for accessories or loyalty programs
Embedding options:
- Adhesive labels: Applied to packaging or product surface
- Sewn into garments: For fashion and textiles
- Embedded in product housing: For electronics during manufacturing
- Integrated into hang tags: Combining traditional and digital features
Data capacity:
- NTAG213: 144 bytes (sufficient for URL and basic data)
- NTAG215: 504 bytes
- NTAG216: 888 bytes (for complex multi-function applications)
Programming and encoding:
- Tags must be encoded with your DPP URL before application
- Can be locked to prevent tampering or reprogramming
- Variable data enables unique tags per product unit
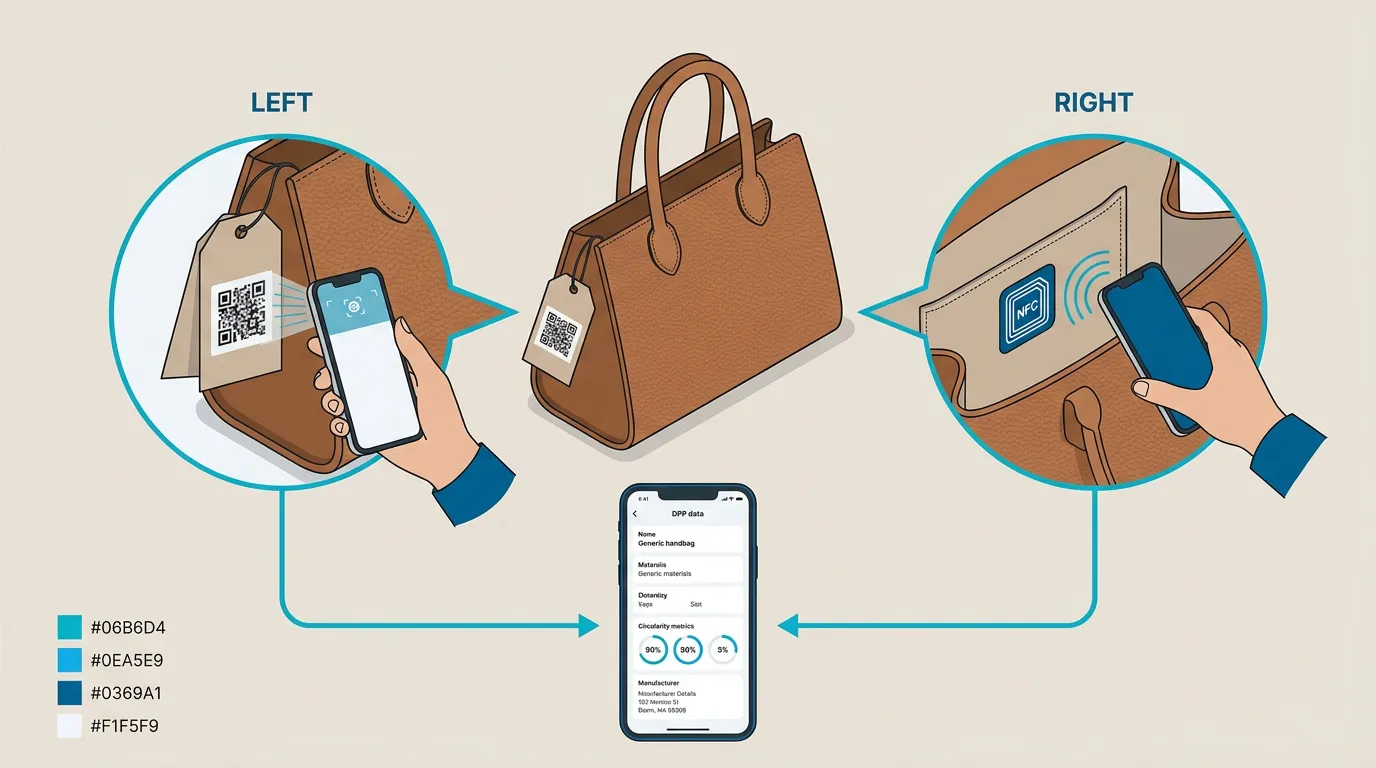
Combining QR and NFC
Many premium brands use both QR codes and NFC to maximize accessibility:
- QR code on packaging (accessible to all consumers, visible and discoverable)
- NFC tag embedded in product (premium experience for NFC-capable devices, permanent access after packaging disposal)
This redundant approach ensures compliance (QR ensures accessibility) while providing enhanced experience for capable devices.
Implementation example: Luxury handbag brand includes both a QR code on the hang tag and care instruction card, plus an NFC chip sewn into the interior lining. Budget-conscious consumers scan the QR code; tech-forward consumers delight in discovering the NFC chip offers instant product authentication and passport access with a simple tap.
Design Integration: Making QR Codes Look Good
QR codes often feel visually disruptive, but thoughtful design integration can make them feel intentional rather than obligatory.
Branded QR Code Customization
Basic black-and-white QR codes work, but customized codes align with your brand identity:
Color customization:
- Replace black with your brand color (maintaining high contrast)
- Works best with very dark colors (dark navy, forest green, dark burgundy)
- Test extensively to ensure scanning reliability
- Never use light or medium tones—contrast is critical
Logo integration:
- Small logos can be placed in the center of QR codes (up to ~15% of code area)
- Built-in error correction compensates for the covered area
- Use brand logos or simple icons
- Test scanning with logo to ensure it doesn't exceed error correction capacity
Shape variation:
- Rounded corners on modules create softer appearance
- Circular or organic module shapes (instead of square)
- Must maintain clear distinction between modules
- Test rigorously as shape changes can affect scanning
Frame and context:
- Add branded frames or borders around QR code
- Include explanatory text within design ("Scan for full product story")
- Use your typography and design language
- Creates cohesive look that feels designed, not added as afterthought
Platforms like PassportPro often include branded QR code generation tools that allow customization while ensuring technical specifications remain compliant.
Using Short URLs and Vanity Domains
The URL encoded in your QR code affects both code complexity and brand perception:
Standard URL problems:
https://www.your-shopify-store.myshopify.com/pages/product-passport?productid=ABC123456789&variant=XYZ
This long URL creates a complex QR code requiring larger size and more precise printing.
Short URL benefits:
passportpro.eu/p/ABC123
Simpler codes are smaller, more reliable, and scan faster.
Vanity domain strategies:
- Use a memorable short domain (
yourband.co/passport/ABC) - Brand-aligned subdomains (
passport.yourbrand.com/ABC) - Partner with DPP platforms that provide branded short URLs
- Consider QR code analytics services (bit.ly, rebrandly.com) if you need tracking
Printed backup: Include the actual URL in human-readable text near the QR code for accessibility:
Can't scan? Visit: passportpro.eu/p/ABC123
This ensures access even if scanning fails.
Visual Hierarchy and Discovery
Placement is important, but so is making QR codes discoverable without being dominant:
For products where DPP scanning is mandatory (EU compliance):
- Make QR code prominent and clearly labeled
- Use instructional text: "Product Passport Required - Scan Here"
- Size appropriately (3cm or larger) to signal importance
For products where DPP is value-added but optional:
- Integrate into information panel with other details
- More subtle sizing (2-2.5cm) alongside other elements
- Softer language: "Discover more" or "Full product information"
Testing visual hierarchy:
- Show packaging mockups to test users
- Ask: "How would you learn more about this product?"
- Track whether users naturally discover QR code
- Iterate based on actual discovery rates
Creating Instructions and Context
Never assume customers know what a QR code is for. Brief, clear instructions improve scanning rates:
Effective instructional text:
- "Scan for Digital Product Passport"
- "Tap for full product transparency"
- "Learn about materials, care, and recycling"
- "Product information and authenticity"
Avoid:
- "QR code" (jargon many consumers don't recognize)
- No explanation (mysterious codes reduce engagement)
- Overly technical language
- Assuming users know this is mandatory for compliance
Icon support: Small smartphone or scanning icons reinforce the action: 📱 ← Simple phone icon 🔍 ← Magnifying glass for "learn more" framing ♻️ ← Recycling symbol if emphasizing sustainability information
Testing QR Codes Before Mass Production
The costliest mistake in DPP physical implementation is discovering scanning failures after printing thousands of packages. Rigorous testing prevents this.
Pre-Production Testing Protocol
Step 1: Digital verification
- Generate QR code and test on screen first
- Scan with multiple devices (iPhone, Android, older phones)
- Verify URL redirects correctly to DPP content
- Check that content displays properly across devices
Step 2: Print test samples
- Print codes at actual size on actual materials
- Test different print methods if considering options (offset vs. digital)
- Include quiet zone and surrounding packaging design elements
- Print slight size variations to test minimum thresholds
Step 3: Multi-device scanning tests
- Test with various smartphone models and operating systems
- Include older phones (Android 8-9, iPhone 8-X) that customers may still use
- Test in different lighting conditions (indoor, outdoor, dim, bright)
- Scan from various distances and angles
Step 4: Environmental stress testing
- Simulate wear (rub codes to test durability)
- Test curved application (bottles, cylinders)
- Expose to moisture/humidity for water-resistant claims
- Fold or crease to simulate handling if applicable
Step 5: User testing
- Ask unfamiliar users to find and scan codes
- Observe whether they discover code without instruction
- Note hesitation points or confusion
- Ask if they found code easily accessible
Document success rates: Aim for 95%+ successful scans across all test conditions before approving for production.
Common Issues and Solutions
| Issue | Cause | Solution |
|---|---|---|
| Won't scan at all | Insufficient contrast, poor print quality | Increase contrast, improve print method, enlarge code |
| Scans inconsistently | Too small, quiet zone violation | Increase size to 2.5cm+, add white space border |
| Scans slowly or requires multiple attempts | Complex code (long URL), low error correction | Use short URL, increase error correction level |
| Distorted appearance | Printing on curved/flexible surface | Enlarge code, select flatter placement area |
| Glare prevents scanning | Glossy or reflective surface | Apply matte finish over QR area, reposition code |
| Code discovered late or not at all | Poor placement, no instructions | Improve placement visibility, add clear text callout |
Production Run Strategies
For first production runs or new products:
- Start with smaller batches (500-1000 units)
- Test samples from actual production run before full run
- Build in flexibility to adjust if issues emerge
- Budget for potential reprints
For established products with proven codes:
- Can proceed with larger production runs
- Still sample-test from each batch
- Monitor customer feedback and support tickets for scanning issues
- Track scanning analytics if using platforms with built-in tracking
Quality control checkpoints:
- Visual inspection: codes print clearly, contrast is high, quiet zone intact
- Representative scanning tests from each production batch
- Dimensional verification: measure actual printed size
- Alignment check: confirm codes aren't cut off by folds or die-cuts
Common Mistakes to Avoid
Learning from others' errors saves significant time and cost. Here are the most frequent DPP packaging implementation mistakes.
Mistake 1: QR Codes That Are Too Small
The error: Using 1cm or smaller QR codes to save space The consequence: High scanning failure rate, customer frustration, potential compliance issues The fix: Always use minimum 2cm x 2cm, preferably 2.5cm+
Many designers underestimate how much physical space reliable QR codes require, especially non-technical designers unfamiliar with scanning reliability requirements.
Mistake 2: Violating the Quiet Zone
The error: Placing text, graphics, or design elements too close to QR code edges The consequence: Scanners can't distinguish code boundaries, leading to failures The fix: Maintain minimum 4-module white border on all sides, always
This error often occurs when trying to maximize space efficiency on crowded labels. Resist the temptation—the quiet zone is non-negotiable.
Mistake 3: Insufficient Contrast
The error: Using light colors, colored backgrounds, or low-contrast combinations The consequence: Scanners can't distinguish modules from background The fix: Use dark colors on white/light backgrounds with minimum 70% contrast ratio
This commonly appears when brands prioritize aesthetics over functionality. Remember: a beautiful code that doesn't scan is useless.
Mistake 4: Placing Codes Where They Can't Be Scanned
The error: Bottom of boxes, inside flaps, obscured by shrink wrap, over sharp folds The consequence: Physically impossible or impractical to scan The fix: Place codes on accessible, flat surfaces visible before opening
Walk through the actual customer experience: Where will the product be when they might scan? Can they physically access that location with a phone?
Mistake 5: No Explanation or Instructions
The error: Bare QR code with no context about what it's for The consequence: Low scanning rates, missed engagement opportunity The fix: Include brief text like "Scan for product passport" or "Product information"
Never assume customers know what your code does or why they should scan it. Clear calls-to-action significantly improve engagement.
Mistake 6: Not Testing on Actual Materials
The error: Testing codes only on paper or screen, not final packaging materials The consequence: Issues with glossy finishes, curved surfaces, or material porosity emerge too late The fix: Always test on actual packaging materials before production
Screen tests and office printer tests don't replicate commercial printing on actual packaging substrates.
Mistake 7: Using Unnecessarily Long URLs
The error: Encoding full Shopify product page URLs with parameters The consequence: Overly complex QR codes requiring larger sizes The fix: Use URL shorteners or dedicated DPP short domains
Compare:
- ❌
www.myshopifystore.com/products/organic-cotton-tshirt?variant=12345678&utm_source=packaging - ✅
psprt.co/p/ABC123
The second creates a simpler, smaller, more reliable code.
Mistake 8: Forgetting About Accessibility
The error: QR codes as the only way to access required information The consequence: Excludes customers without smartphones or those unable to use cameras The fix: Include typed URL as backup and ensure critical compliance info is also in traditional formats
For EU regulatory compliance, ensure mandatory information is accessible to all, not just smartphone users.
Mistake 9: Not Planning for Updates
The error: Encoding static URLs that can't be redirected if DPP platform changes The consequence: Printed codes become obsolete if you switch systems The fix: Use redirect-capable short URLs or domains you control
If you print passportpro.eu/p/ABC123, PassportPro can update where that redirects even after printing. If you print your actual database URL, you're locked in.
Mistake 10: Skipping Production-Run Sampling
The error: Approving full production without testing actual printed samples The consequence: Discovering failures only after producing thousands of unusable units The fix: Always require and test physical samples from production runs before approving full quantity
This final checkpoint catches issues that digital proofs miss: ink quality, registration problems, material reactions, finishing effects.
Packaging Implementation Checklist
Use this checklist for every product packaging design incorporating DPP access:
Design Phase:
- QR code size is minimum 2cm x 2cm (preferably 2.5cm+)
- Quiet zone of 4 modules maintained on all sides
- Contrast ratio meets >70% minimum (ideally black on white)
- URL is shortened for code simplicity
- Error correction level M or Q selected
- Placement location chosen (accessible, flat surface)
- Instructional text included near code
- Backup URL provided in human-readable text
- Code visible before product opening (where required)
- Design integrates aesthetically with brand
Print Specification Phase:
- Resolution specified at 300 DPI minimum
- Print method appropriate for quantity and quality needs
- Material surface suitable for scanning (matte preferred)
- Color specifications ensure high contrast
- Packaging die-cuts don't interfere with code placement
- Folds and creases avoid code area
Testing Phase:
- Digital code generated and tested on-screen
- Printed test samples on actual materials
- Scanned successfully with multiple devices (95%+ success rate)
- Tested in various lighting conditions
- Tested at expected scanning distances
- User testing confirms code discovery and accessibility
- Environmental stress testing completed
Production Phase:
- Sample units from production run tested
- Visual inspection confirms print quality
- Dimensional check confirms actual printed size
- Representative scanning test from batch
- Quality control documentation maintained
Post-Production:
- Customer feedback monitoring for scanning issues
- Analytics tracking scan rates (if available)
- Documentation of packaging version for future reference
Using PassportPro for Seamless Packaging Integration
While the physical aspects of QR code implementation are universal, the backend management significantly affects success. PassportPro simplifies the path from digital compliance to physical packaging.
Automated QR code generation:
- Codes automatically generated for each product
- Optimized for size and error correction
- Branded customization options
- Downloadable in multiple formats (PNG, SVG, PDF, EPS)
Short URL management:
- Branded short URLs for cleaner codes
- Redirect management if you change platforms
- Analytics on scan rates and locations
Packaging-ready exports:
- Files formatted for professional printing
- Multiple sizes pre-generated for different packaging types
- Print specification guides included
- Color profiles for offset and digital printing
Multi-product management:
- Bulk generation for product catalogs
- Variant handling (different codes for different sizes/colors as needed)
- Archive management for discontinued products
Integration with Shopify:
- Seamless connection to product catalog
- Automatic updates when product information changes
- No manual data entry required
This technical support allows you to focus on design and customer experience rather than backend complexity.
Conclusion: Bridging Digital Compliance with Physical Design
Digital Product Passports exist at the intersection of regulatory compliance, consumer engagement, and brand storytelling. While the digital data is essential, physical implementation through packaging determines whether that information actually reaches customers.
Successful DPP packaging implementation requires attention to technical specifications—minimum 2cm size, high contrast, proper quiet zones, 300+ DPI resolution—alongside thoughtful design integration that makes codes discoverable, scannable, and aligned with your brand identity.
Different packaging types demand different strategies: retail boxes benefit from back-panel placement, poly bags need larger codes to account for flexibility, hang tags offer premium space for enhanced codes, and direct product marking creates permanent lifecycle access.
Common mistakes—codes that are too small, violated quiet zones, poor placement, insufficient contrast—are entirely preventable through proper specification and testing. Rigorous pre-production sampling and multi-device testing ensure reliable scanning before committing to production runs.
The investment in getting physical implementation right pays dividends in customer satisfaction, regulatory compliance, and brand differentiation. A seamless scan that reveals comprehensive, beautifully presented product information creates moments of transparency that build trust and loyalty.
Whether you choose QR codes, NFC tags, or a combination approach, the goal remains constant: making your Digital Product Passport accessible, scannable, and valuable to every customer who encounters your product. With careful planning, thoughtful design, and rigorous testing, your packaging becomes the bridge between physical product and digital transparency.
Ready to get started?
Create EU-compliant Digital Product Passports for your Shopify store in minutes.
Install PassportPro on Shopify